by: Ivan Elsasser
“The other day I was mastering a song for a very demanding client. So I went to my plug-ins folder, selected iZotope Ozone 10, clicked on Maser Assistant, and that’s it! I earned $50 in less than 1 minute.”
Well… I wish it were like that, haha. We are not yet at that moment of history (It makes me wonder: will AI master like a human? I leave you the question), but iZotope Ozone 10 does bring us closer.
In the realm of audio and music, we encounter one of the great technologies of our times, courtesy of one of the leading companies in this market. Specifically, I’m referring to iZotope’s mastering plug-in, iZotope Ozone 10 (here the latest version). I am pleased to introduce it to Music Library Report, where you can explore a variety of insightful software and hardware reviews.

With a great heritage already embedded in its legacy, this review will delve into the advances that the iZotope Ozone 10 version brings. Notably, it promises a tool capable of matching the sound of chart-topping hits. This is made possible through features such as the “Master Assistant,” complemented by its powerful interface and high level of processing.
This can be of great help in industries such as Music Licensing in which we producers very often must take care of the master and the quality must be the best possible to enter our music in the best libraries.
I’ve used Ozone since its earliest versions, and it’s always had a place in my mastering chain, and sometimes on separate channels in the mix as well, although for that it may serve better iZotope Neutron. I will leave tips and tricks that I usually use with this plug-in.
First and foremost, we must understand that we can use iZotope Ozone 10 in two ways.
- Initially, there’s the mother plug-in called the “Mothership Plug-in” that brings features such as Master Assistant, Referencing, Codec Preview, and Dither. In this configuration, the modules are placed as a chain.
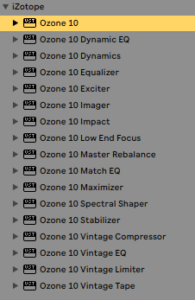
- Alternatively, we can use these modules as independent plug-ins, referred to as “Component plug-ins.” These include Dynamic EQ, Dynamics, Equalizer, Exciter, Imager, Impact, Low End Focus, Master Rebalance, Match EQ, Maximizer, Spectral Shaper, Stabilizer, Vintage Compressor, Vintage EQ, Vintage Limiter, and Vintage Tape.
Let’s start with the big ship.
Mothership Plug-in of iZotope Ozone 10
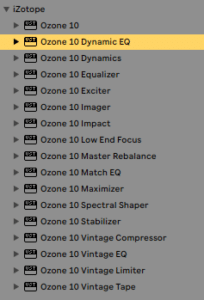
You will find it in your plug-ins folder as “iZotope Ozone 10”.
(Image from my Ableton Live plugi-ins folder)
By simply applying it to a channel in your DAW and opening it, you will see the typical Ozone interface, but modernized. It has a futuristic and minimalist, intuitive feeling. Let’s look at the most important aspects of the interface (we won’t look at all of them, just the ones we’ll use the most, to keep this review focused on practicality).
Interface
Above: Name of this instance, Master Assistant, Presets, Undo History and Setup.
A little further down: Chain of modules (“+” button).
Center: The controls and meters of the selected module.
Right: VU meters, gains and reference. The reference is particularly useful for making A/B comparisons while mastering (you just have to upload a track there). The VU meters allow us to see the peak, RMS, LUFS, etc levels in real time. There is also “Sum to Mono”, which allows you to check the master in mono and “Gain Match” that matches the output gain with the input gain.
Presets
One of the quickest ways to explore any plug-in is by trying presets. Moreover, you will find them for all types of genres. Just try them, and you will see how the modules are organized in the chain and how they work.
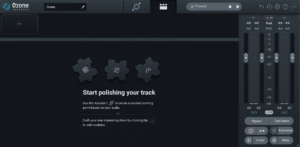
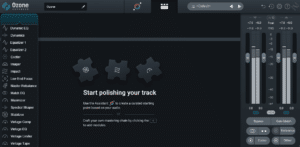
Master Assistant of iZotope Ozone 10
This is perhaps the most innovative part of iZotope Ozone 10. Personally, it has helped me a lot, it is always useful to see what suggestions it gives us. According to iZotope, this function is powered by artificial intelligence, although they do not specify how it does so.
After locating iZotope Ozone 10 in our Master channel, to activate this function, we just have to click on the button at the top, with some circles.

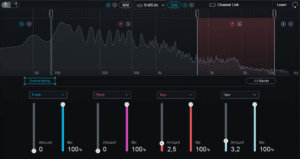
iZotope Ozone 10 will ask us to play our song, the loudest part. It will recognize the genre (it does not always achieve this precisely) and will create a mastering chain. It will automatically take us to the controls view, which is nothing more than some controls mapped to some modules in the modules chain view: Imager, Impact, Maximizer, EQ, Stabilizer.
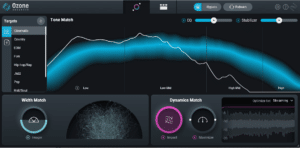
Also on the left we will find 10 genres, if we are not satisfied with the one selected, we can select another one, and the assistant will try to match the tonal balance, width, dynamics and loudness of our song with the average of the selected genre (by modifying the parameters of modules in the master chain). We can also use our own reference by clicking on the “+” next to “Targets”, that is, select a song that has a master that we consider appropriate, and ask the assistant to match it with that song (which I recommend).
Tip: better if you cut about 20 seconds of the reference song at its loudest moment, and use that sample.
The Gain Match
The Gain Match button is very useful to compare before and after without fooling ourselves with the increase in volume. Another very cool thing about this function is that while it is on, if we turn off any module, it will instantly compensate for the difference in gain.

The sliders that each module has affect each one differently. For example, the EQ increases or decreases the gains of the bands. To see what each one does, you can go to the modules chain view by clicking on the icon next to the Assistant and move the “Amount” from there.

Sections
But you may wonder how the Master Assistant configures each section? Let’s look at it quickly, and then we will see in greater depth how each module works:
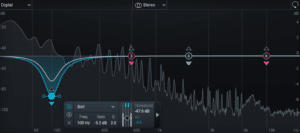
- EQ and Stabilizer: they will try to bring the equalization (or rather the Tonal Balance) of your track closer to that of the reference. While the EQ is a normal EQ, the Stabilizer is an adaptive EQ that will respond in real time to each frequency, to tame it or boost it. In my opinion it works in a similar way to plug-ins like Soothe.
- Width Match: the typical already known 4-band Imager, which simply raises or lowers the gain of the Side channel of each band.
- Dynamics: Use the Impact and Maximizer module. Impact controls microdynamics compressing or expanding each band, it’s that simple.
The Maximizer is a limiter with auto gain. It will bring the LUFS of your track to -10 LUFS if you select a genre, or to the LUFS of the custom reference if you used one. Additionally, the output level will be at -1db if you use the “Streaming” option and with the slider you can give it +/- 4db or the output will be at -0.1db if you use “DJ Player” and you can give it +/- 6db with the slider.
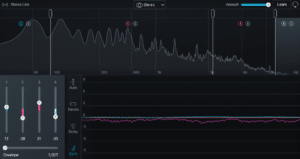
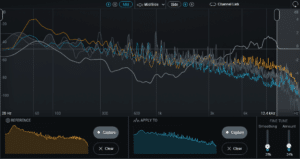
Finally you will see the iZotope Ozone 10 spectrum. The blue line is the tonal balance of the reference, and the white line is the tonal balance of your track. By moving the EQ and Stabilizer sliders the white line will get closer to the blue (Tonal Balance is the distribution of energy across the audible frequency spectrum. Not to be confused with a common spectrum).
Modules of iZotope Ozone 10
In the modules chain view you will find a “+” in the Signal Chain. Click it and open a module. Each module has an on/off, solo, presets, and difference gain meter. You will find the following modules:
Depending on the module, you will find the possibility of using it in Stereo, Mid/Side or Left/Right mode (and its Channel Link option to modify both channels at the same time).
Let’s go one by one briefly and practically.
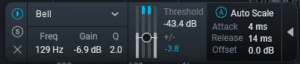
Dynamic EQ
For those who don’t know dynamic EQs, they are something like a combination between a compressor and an EQ. Each band has a Threshold control, if the signal reaches it, then it acts.
It has 2 modes:
- UP: When a signal exceeds the threshold, the filter will move upwards.
- Positive Gain: Using the Up trigger mode will move the filter from the center line toward the static node (boost when triggered).
- Negative Gain: Using the Up trigger mode will apply the full negative gain until it is triggered-when triggered it will move toward the center line.
- DOWN: When the signal exceeds the threshold, the filter will move downwards.
- Positive Gain: Using the Down trigger mode will move the filter from the static boost value toward the center line (cut when triggered).
- Negative Gain: Using the Down trigger mode will move the filter from the center line toward the static negative gain value.
Honestly, I use these modes indifferently, as long as I obtain the desired result.
It also has the basic controls of a compressor if we go to the “Advanced” section of each band:
Finally, on the top left we can choose between Digital or Analog, Digital being an EQ that does not phase the original phase of the track in exchange for greater CPU usage.
Regarding the spectrum, while the white line is the final response that the song is having after applying the bands, the blue line is the response applied by the filter.
Tip: by holding Alt or Option we can listen to the band solo. It has several more shortcuts to lock movement, move slower, etc.

If you are curious about Dynamic EQs you can check MAutoDynamicEq here.
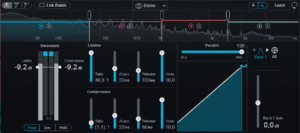
Dynamics
There is not much to say other than that it is an excellent multiband compressor, which can function as a compressor, expander and limiter (not brickwall, but more like analog one). Quite intuitive, I don’t think it’s necessary to inquire too much.
Perhaps the most innovative function is “Learn,” which automatically reorganizes the bands in the frequency range according to the minimum detected in the frequency spectrum of your track. Additionally, it is worth noting that with the three buttons on the top left, we can see the gain reduction for each band or apply a pre-threshold detection filter.
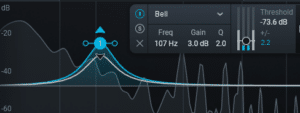
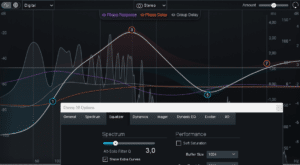
Equalizer
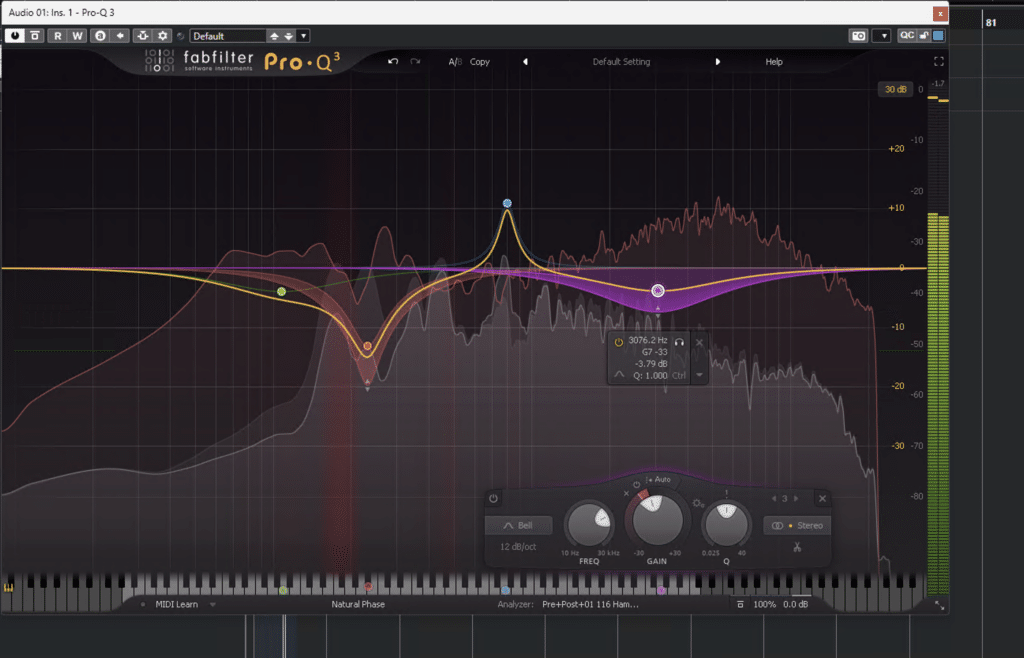
Two “normal” equalizers with the ability to make linear phase in “Digital” mode and correct the phase of each band, with 0% Linear Phase (interesting). You may know Linear Phase function from FabFilter Pro-Q, another great boy!
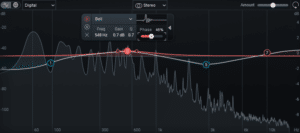
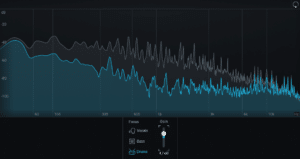
Tip: If you enable the “Show Extra Curves” option in the Options, you will be able to see some more data:
The difference between a signal with linear phase and one shifted out of phase by an EQ is subtle but important. The phased one has a small dose of phaser and loses power, although this gives it a bit of uncontrolled stereo widening, but for this purpose it is better to use an appropriate stereo expander. After all, it’s a matter of taste. I prefer linear phase in the master!
Tip 2: The bands have different types of behavior. For example, Shelf-type belts have Baxandall or Pulteq (Vintage) emulation.
Exciter
A multiband exciter with several types of excitement. An exciter adds harmonics according to the amount we give it. Perhaps my favorite trick is to use the exciter in Mid/Side mode and give a little more excitement to the Side to achieve a different and natural stereo opening.
Tip: the oversampling function is good to avoid aliasing.
Imager
We had already seen something, to make it simple, each band increases or decreases the gain of the Side in that frequency range.

Stereorize: It creates a copy of the mono channel and injects it into the stereo with a delay of 1ms to 20ms that we can control with the slider (it’s mono compatible, yeah!).
Recover Sides: When we subtract width from each band, you will notice that the volume of that band decreases, because we are subtracting gain on the side channel at that frequency. Then we can recover the gain of those frequencies and inject it into the mono channel in the amount that we set with the slider.
Tip: We will try to keep the phase correlation between 0 and +1, which indicates that the L and R channels are “healthy” unequal.
Impact
We’ve previously discussed this aspect; to emphasize, sliding up expands, while sliding down compresses. Additionally, the envelope function dictates the time for it to act and return to the baseline, providing options for sync or milliseconds. This tool proves compelling for refining dynamics effortlessly, eliminating the need for complex multiband compressors.
Low End Focus
One of my favorite modules, and it’s truly amazing what you can achieve when defining the low end.
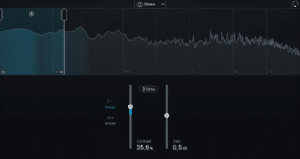
It’s really simple: select the frequency range, adjust “Contrast” (and “Gain” if necessary), and magically the kick becomes top-notch while the bass is cleaned of muddiness.
In Punchy mode, short response times emphasize transients, whereas Smooth uses long response times to provide more sustain.
What does it do then? Increase or decrease the difference between low and high level content.
How does it do? It’s a mystery.
Master Rebalance
Its intention is to highlight or attenuate the drums, bass or vocals, as we select. Although iZotope says that it is Machine Learning technology, it is not something that I use a lot since I usually do the mixes too, and if I need more drums, I go to the mix and that’s it, hehe. But it can produce truly amazing results for someone who doesn’t have access to the mix.
Tip: use it with Gain Match on to notice the changes without problems.
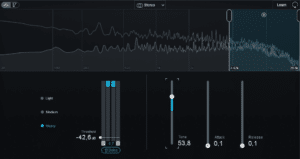
Match EQ
Another of my favorites from iZotope Ozone 10! I always use it individually in the master to match the reference with my song. I don’t always leave it, but it is a very valid second opinion.
Simply capture the reference audio, and then that of your song. With “Amount” you give the amount of EQ and with “Smoothing” you adjust the Q point of each band. You can also use the left and right frequency selectors to leave areas unprocessed.
Although with the Smoothing at 0% and the Amount at 100% it would be the perfect Match, in reality it results in obnoxious artificial filters. It is best to use it at Smoothing levels close to 30% and Amount no more than 50%.
Don’t forget to click on “Clear” whenever you capture again, otherwise it will do so on the signal that it is currently processing.
Tip: I usually use the Mid/Side mode and give different values ??to Amount and Smoothing to generate stereo apertures.
Maximizer
The beast of iZotope. Perhaps it is because of the Maximizer that iZotope has been so widely used for so long.
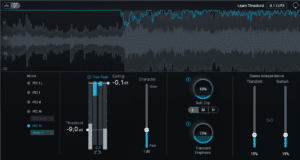
The “Learn Threshold” option is a new addition to the intelligent features of iZotope Ozone 10. This feature contributes to the tool’s capabilities by adjusting the loudness of our song to the LUFS level we specify.
Otherwise, the most impressive thing is the number of IRC Modes (Intelligent Release Control). It is clear that iZotope wants us to associate its products with intelligence, right? hehe.
Reviewing each of the Modes would make this review endless, but in summary each one applies a different type of release. It’s a matter of testing. The one I use the most is IRC IV Modern. The only thing to keep in mind is that the higher the IRC, the more CPU usage.
Remember to activate True Peak to avoid distortions if you are limiting a lot.
The “Character” controls the attack and release in a mysterious and different way for each Mode.
The “Soft Clip” applies clipping to the signal before entering the Maximizer. The slider is the dry/wet control, Light places the clipper 3db below the threshold, Moderate 9db and Heavy 30db. It can be useful to smooth some transients before limiting.
“Transient Emphasis” shapes the transients before entering the Maximizer. The higher the slider, the sharper the transients.
Finally, the “Stereo Independence” allows you to model the transients and sustain parts independently. When they are at 100% you can achieve more loudness but at the cost of a narrow stereo image.
Spectral Shaper
Essentially a compressor. Allows you to smooth out the peaks in the selected area.
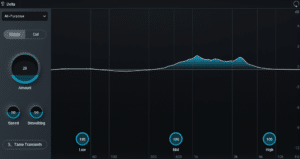
Stabilizer
We had already talked about it. In short: it is an adaptive equalizer with bands that adjust automatically in real time, according to the parameters we enter, with respect to a reference genre that we select.
In “Shape” Mode it allows subtracting as well as adding, in “Cut” mode only subtracting.
Vintage Comp, EQ, Limiter, Tape
I will not go into these modules in detail, since their functions are rather classic. I’ll just give you some curiosities:
- Vintage Comp: It is a feedback compressor that emulates analog compressors.
- Vintage EQ: emulate frequency response of the Pultec EQP-1A and Pultec MEQ-5.
- Vintage Limiter: modeled after the Fairchild 670. It can be useful before the Maximizer or first in the master chain. Analog: Brings out the low-end transients while still providing smoothness. Tube: variable attack and release times. Provides smooth feedback limiting with a wider range of sonic characteristics. Modern: blends non-linearity with modern IRC limitation.
Component Plug-ins in iZotope Ozone 10
We call Component Plug-ins the modules that we already saw, but when we use them independently and not in the Mothership Plug-in. In the image, from Ozone 10 Dynamic EQ down.
The big difference is that we can use only one of them without having to overload the CPU with the Mothership Plug-in. In fact, this is the way I use iZotope Ozone 10 the most, because I use other plug-ins in my master chain, and maybe I need to place, for example, the Low End Focus, after a non-Ozone compressor, or that kind of things. The only unfavorable thing is that the Components Plug-ins do not have Master Assistant, so sometimes I have to use the Mothership and copy the parameters to the Component Plug-in in question.
My favorite modules and features of iZotope Ozone 10
- Low End Focus
- Match EQ
- Exciter
- Imager
- Maximizer
- Master Assistant
- Reference
- Gain Match
And that’s all my dear friends! It has been a pleasure for me to do this iZotope Ozone 10 review for Music Library Report, I am eternally grateful. Until next time.